
Appearance
📱 Kurloo Mobile App User Guide
Brilliantly Simple Remote Monitoring at Your Fingertips
Revision Sheet
| Release No. | Date | Revision Description |
| Rev 1 | 2025/04/25 | Initial revision by Charles Swei |
Table of Contents
1. Introduction
1.1 About Kurloo
Kurloo is a brilliantly simple, Australian-made technology designed to monitor ground and structural movement with high precision. Combining autonomous GNSS sensors with a cloud-based platform and easy-to-use mobile app, Kurloo empowers engineers, asset managers, and field teams to track displacement data in near real-time—no complex wiring, no bulky setups. Inspired by the keen-eyed Bush Stone-Curlew, Kurloo quietly observes and reports, helping you make confident, data-driven decisions to prevent critical failures before they happen.
1.2 What the Mobile App Can Do
- Log in securely and access your Kurloo projects and devices
- View and interact with nearby Kurloo devices via the map
- Install new devices with guided steps, including location info, photos, and notes
- Perform maintenance activities like inspections, replacements, and site transfers
- Check GNSS signal, RSRP strength, battery level, and system status in real-time
- Capture and upload site photos and field notes
- Work offline and sync data once a connection is available
- Receive alerts when movement thresholds or device issues occur (WIP)
- Sync all data to the Kurloo Nest platform
- Export or share device readings and logs with your team
Whether you’re installing, monitoring, or maintaining—this app’s your all-in-one field toolkit.
1.3 Device, Platform & App Overview
The Kurloo ecosystem consists of three core parts that work together seamlessly. The Kurloo Monitoring Station and Reference Station are rugged, solar-powered GNSS sensors that autonomously collects high-precision displacement data. The Kurloo Nest is our secure cloud platform where your data is processed, visualised and stored—giving you insights. The Kurloo Mobile App ties it all together in the field, letting you install devices, perform maintenance, and monitor device health, all from your phone or tablet. It’s brilliantly simple, and built for the realities of Australian worksites.
1.4 Who This Guide is For
This guide is for anyone who uses the Kurloo mobile app in the field or office. Whether you’re a field technician installing devices, a project engineer overseeing performance, or a site manager reviewing data, this guide walks you through everything from setup to troubleshooting. No jargon, just what you need to get the job done right.
1.5 Support & Resources
If you need a hand, we’ve got you covered. Reach out or explore at your own pace:
- Email Support – support@kurloo.io
- Call Us – +61 7 3366 3525
- Kurloo Website – www.kurloo.io
- Documentation & User Guides docs.kurloo.io
- Kurloo Nest Platform app.kurloo.io
- Training & Demo Videos – YouTube Playlist
- Reseller Dashboard – device status
We’re always here to help, whether you’re just getting started or deep in the dirt.
2. Getting Started
2.1 Downloading the App (iOS & Android)
To get started, install the Kurloo mobile app on your device:
- iOS users – Go to the App Store and search for “Kurloo”, or visit: https://apps.apple.com/au/app/kurloo/id6447710915
- Android users – Head to the Google Play Store and search “Kurloo”, or visit: https://play.google.com/store/apps/details?id=io.kurloo.kurlooApp
Make sure you’re downloading the official app by Kurloo Technology
Once installed, open the app and log in with your Kurloo credentials to begin. If you don’t have an account yet, contact your project lead or support@kurloo.io to get set up.
2.2 Minimum Device Requirements
To ensure the Kurloo mobile app works reliably in the field, your device should meet the following minimum requirements:
Operating System
- iOS: Version 14.0 or higher
- Android: Version 13.0 (Tiramisu) or higher
Connectivity
- Stable internet connection (Wi-Fi or 4G/5G recommended) Note: An internet connection is only required for downloading the app, signing in, loading project data, and uploading records. Once your project is loaded, you can work offline while on site. You can sync the records when you’re back online.
- Bluetooth enabled for communication with Kurloo devices (WIP)
- GPS/location services enabled for accurate site positioning
Storage and Performance
- Minimum 30 MB of free storage space
- At least 2GB of RAM recommended for smooth operation
Older or budget devices may still function, but you might notice reduced performance or occasional compatibility issues. For best results, use a modern smartphone or tablet.
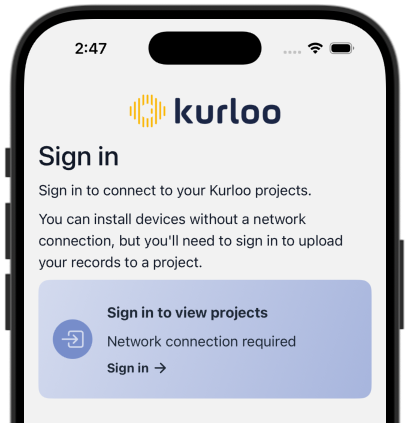
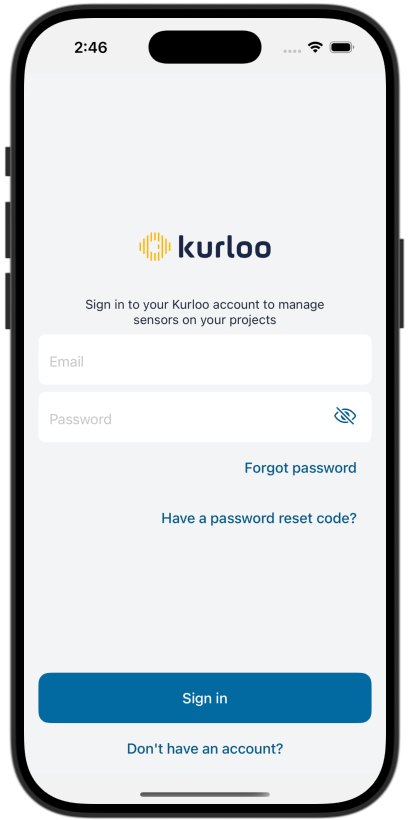
2.3 Logging In
When you open the Kurloo app for the first time, you’ll be prompted to sign in using your Kurloo account credentials.
- Use the same email and password you use for the Kurloo Nest platform.
- If you’re part of a team, your access will be linked to your assigned projects.
You can create and draft a record without logging in, which is handy when you’re offline or still setting up. However, you’ll need to log in to upload the record and sync it with Kurloo Nest. Alternatively, you can export the draft and send it to your project administrator.
Learn how to export a record file
If you don’t have an account, contact your administrator to get an invitation for your Kurloo account.
2.3.1 Forgotten Password
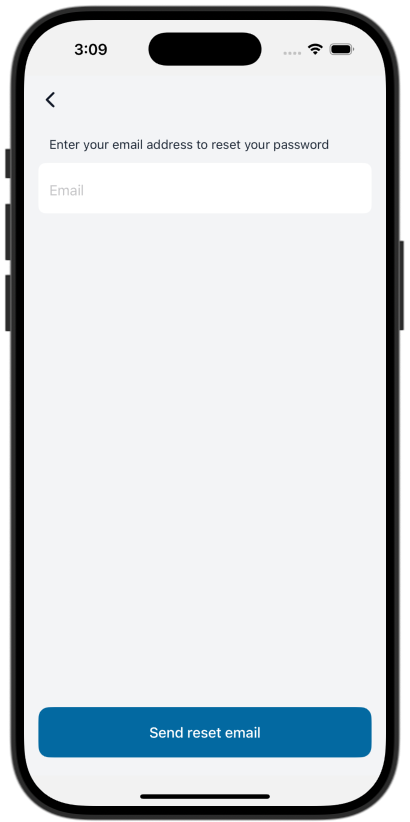
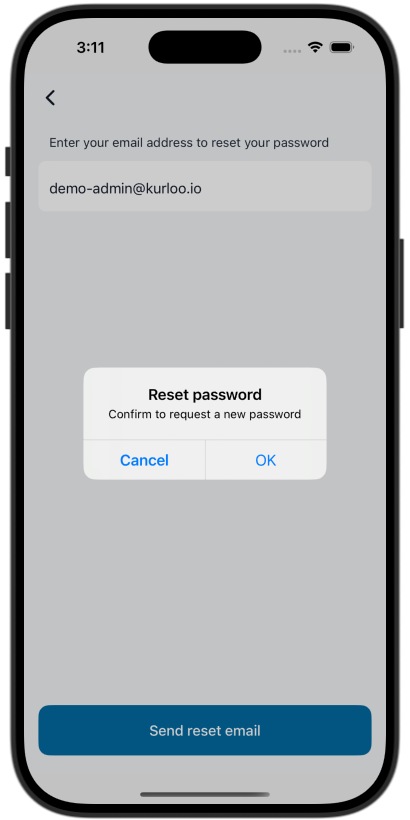
If you’ve forgotten your password, it’s easy to reset:
- On the login screen, tap “Forgot Password?”
- Enter your registered email address
- You’ll receive an email with a reset link
- Follow the link to create a new password
Make sure to check your spam or junk folder if the email doesn’t arrive within a few minutes. Still no luck? Reach out to support@kurloo.io and we’ll help you get back in.
2.3.2 Two-Factor Authentication (if applicable)
If your account has enabled two-factor authentication (2FA), you’ll be asked to verify your identity after entering your email and password.
How it works:
- Log in with your Kurloo credentials
- A verification code will be sent to your registered email or mobile
- Enter the code in the app to complete sign-in
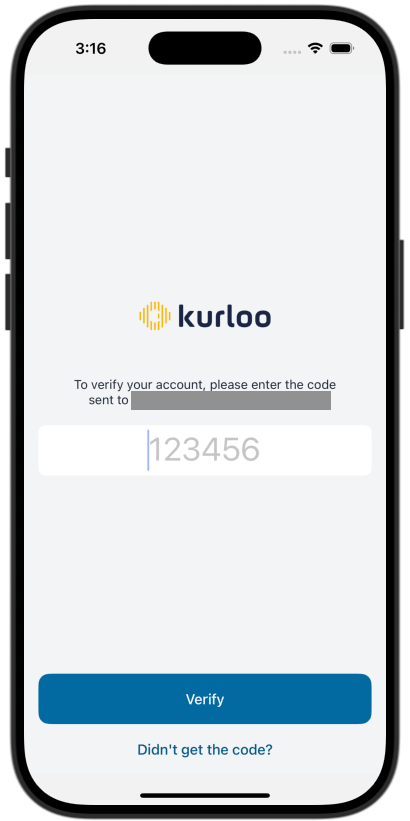
This extra step helps keep your data secure—especially for projects with strict access requirements. If you’re having trouble receiving the code, contact support@kurloo.io.
2.4 Interface Overview
The Kurloo mobile app is built for speed and simplicity, whether you’re out in the field or reviewing data from the ute. The main navigation is located in the navigation tabs and includes three key functions:
⸻
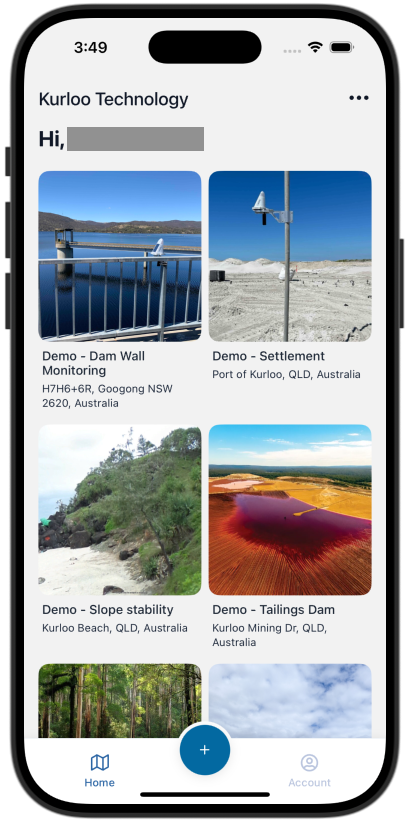
Home Screen
- View all your available projects or your current project in map view
- See devices limited to the selected project on an interactive map
- Access the full sensor list with quick links to detailed info including photos, displacement readings, and installation details
- Switch between projects or accounts (if your role allows)
⸻
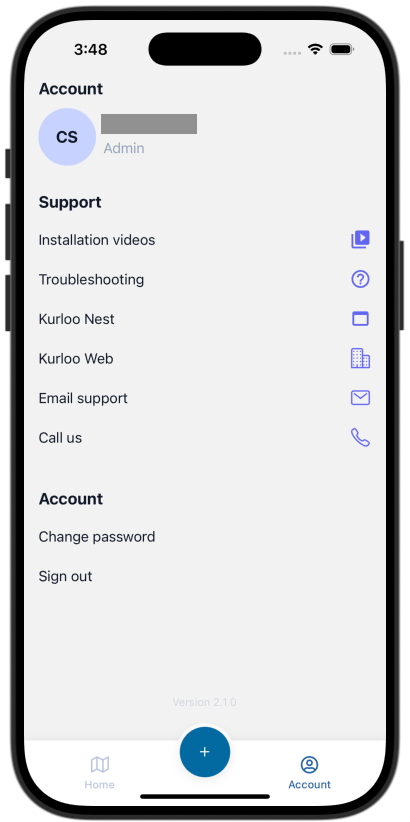
Account Screen
- Tap the account icon to view your user details and role
- Access support resources, including contact details and help guides
- Change your password or log out securely
- If two-factor authentication (2FA) is enabled, account security settings must be managed in Kurloo Nest
⸻
Quick Start
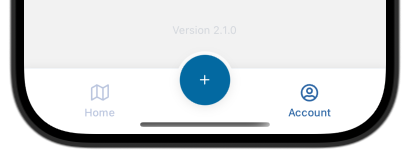
- Start with blue "+" button located at the bottom-middle of the Tab bar
- Launch key actions instantly:
- Create a new Installation, Maintenance, or Replacement record
- Search for a sensor and view detailed information
- Designed to keep you moving without digging through menus
⸻
With everything just a tap away, the Kurloo app makes it easy to install, inspect, and manage your monitoring points—fast, clear, and brilliantly simple.
3. Installing a Kurloo Device
Installing a Kurloo device is a straightforward process when you have the right tools and follow the guided steps in the app. This section outlines everything you need to know to complete an installation confidently.
3.1 Preparing (Before attending site)
Before heading to site, ensure the Kurloo device and your setup tools are ready to go. Proper preparation helps you avoid delays and makes the on-site process much smoother.
3.1.1 Check the hardware
- Confirm you have all components: Kurloo device, antennas, mounting bracket, and screws
- Visually inspect for any damage or missing parts
3.1.1.1 Required Kurloo Hardware
- Kurloo monitoring/reference device (charged and ready)
- LTE-M antenna
- Wi-Fi antenna (if applicable)
- Kurloo Wing (if applicable)
3.1.1.2 Mounting Equipment
**Extension pole**

- 25cm 5/8" extension pole

**Post cap**

- Kurloo post cap

**Kurloo vandal-proof mounting bracket**

- 60mm OD vandal-proof mounting bracket (3 pieces)
 - M5 x 8mm T25 Torx security screws (x8)
 - M8 x 25mm T40 Torx security screws (x2)
 - Specialty Torx security bits or keys

**Optional (for positioning or survey-grade install)**

- Kurloo Wing (TBD)
 - 360° prism
 - Survey pole (25mm 5/8" thread)
3.1.2 Charge the device
- If the device hasn’t seen sunlight recently, via *Kurloo charging cable or allow it to charge under direct sun before use
- The solar panel will maintain charge once installed
3.1.3 Download the Kurloo app and sign in
- Latest version of the Kurloo mobile app
- Signed in and project loaded (then you can work offline if needed)
- Make sure the app is installed and you're logged in with your Kurloo credentials before arriving on-site
- Ensure your assigned project is loaded—this enables offline access if mobile reception is limited
By sorting this out ahead of time, you’ll be ready to get straight into installation once you're on location.
3.2 Performing Installation (When on site)
3.2.0 Field Checklist
- Clear sky view for GNSS signal
- Safe access to installation site
- Confirmed project and sensor location via app or plan
Tip: Make sure your LTE antenna points toward the nearest mobile tower for best signal, and position the solar panel to face north in the Southern Hemisphere.
Once you’re on site and ready to install, the Kurloo app will guide you through the installation process.
3.2.1 Scanning the Device
To begin the installation, the first step is to identify and link the Kurloo device using the mobile app. This ensures the device is correctly assigned and installation quality is traceable.
Follow these steps:
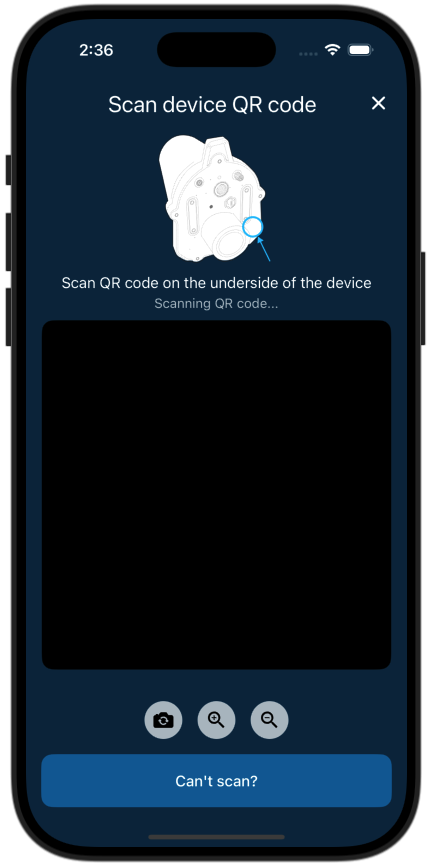
- Open the Kurloo app and tap the Quick Start button (the "+" on the tab bar)
- Use your phone’s camera to scan the QR code located on the bottom of the Kurloo device
- The app will automatically detect and populate the device's serial number and associated details
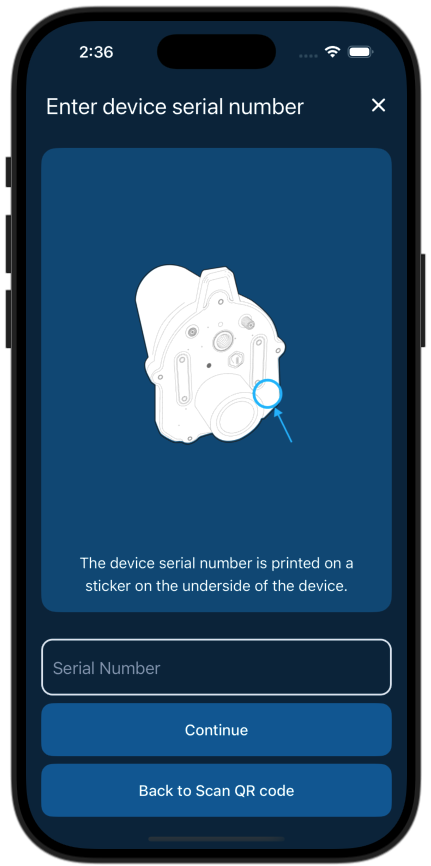
If the QR code is damaged or won’t scan:
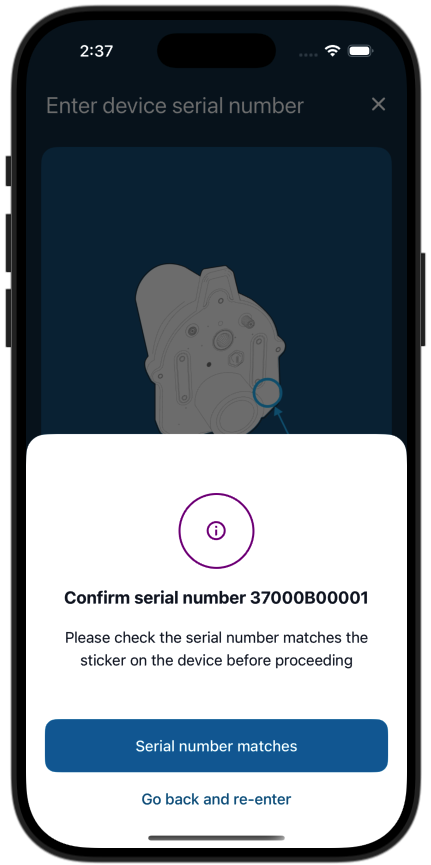
- Tap “Can’t scan?” to enter the serial number manually
- Double-check the number before continuing
Device serial numbers are 11 characters long and include a mix of letters and numbers (e.g.,
37000C12345)
Once scanned or entered, the app will guide you to the next step in the installation process.
3.2.2 Confirm Project and Initialise Device
Complete the following steps before filling the record.
- [ ] Select Project
- [ ] Attach Antennas
- [ ] Power On the Device
- [ ] Check LED Status
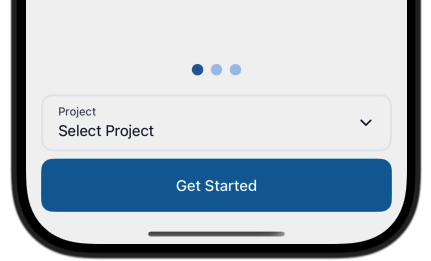
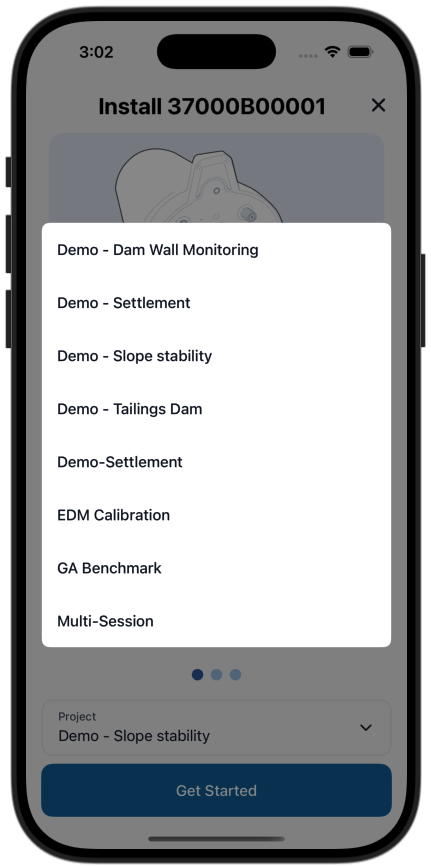
3.2.2.1 Select Project
After scanning the device, the app will prompt you to confirm or select the correct project. Make sure you're installing under the intended project to ensure all data is assigned accurately.
3.2.2.2 Attach Antennas
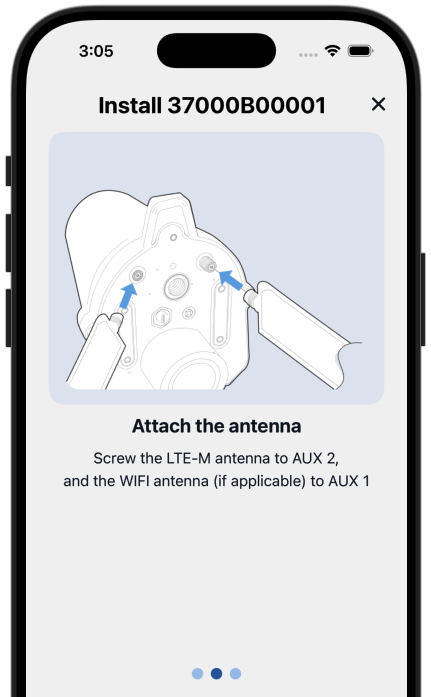
- Connect the LTE-M antenna to the labelled port (AUX-1)
- If applicable, connect the Wi-Fi antenna to the second port (AUX-2)
- Hand-tighten both antennas—avoid over-tightening to prevent damage
3.2.2.3 Power On the Device
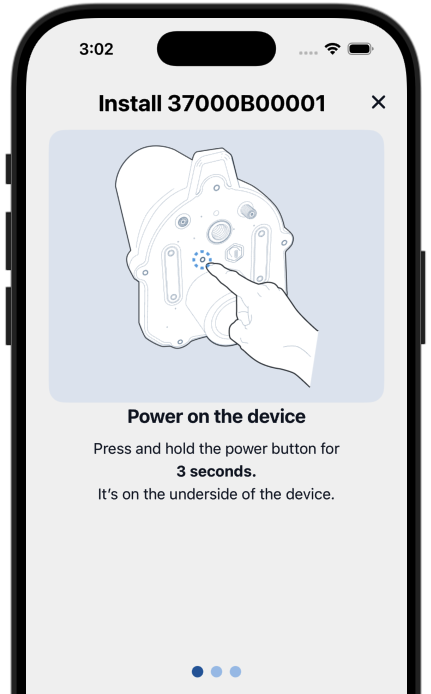
- Press and hold the power button for more than 3 seconds
- Indicator LEDs will flash to show the device is powering up
3.2.2.1 Check LED Status (WIP)
The LEDs will flash for 10 seconds when the device is first powered on. After the LEDs turn off, you can quickly press the power button to briefly reactivate the LED indicators and check the device status.
- Ensure the following LEDs are solid or flashing green:
- Power
- GNSS (satellite signal)
- RSRP (device connection signal strength)
If any LEDs remain off or red:
- Try repositioning the device for clearer sky view or better mobile reception
- Refer to the troubleshooting section if issues persist
It's recommended to confirm good signal strength before securing the device to avoid unnecessary rework.
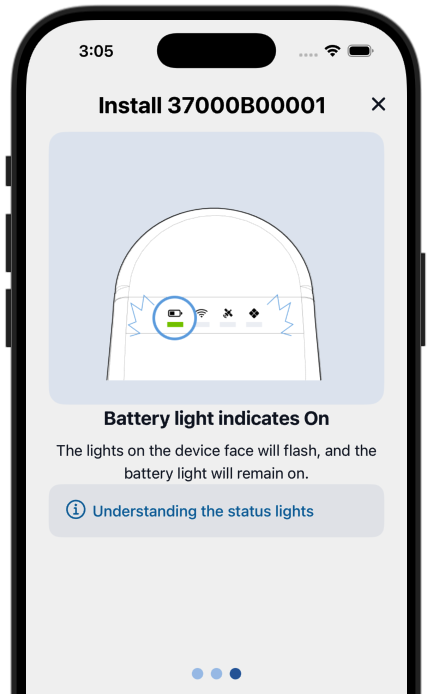
You can also tap “Understand the status lights” in the app to view detailed LED indicator instructions. This is a handy reference if you're unsure what the lights are telling you.
3.2.2.2 Understanding the LED Status Lights
Kurloo devices use four status lights to communicate power, connectivity, and operational status. You can also tap “Understand the status lights” in the app for a visual reference. Here's what each indicator means:
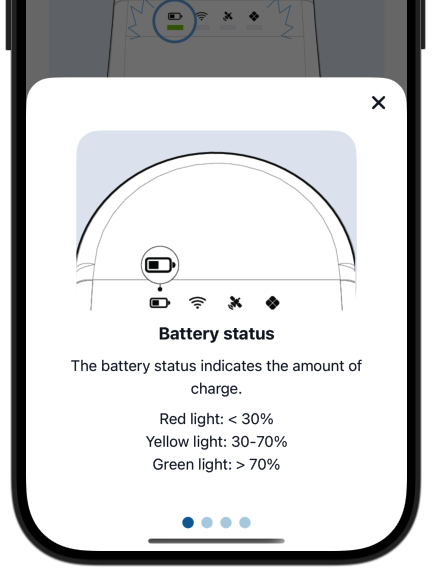
Battery Status
Indicates the current battery level:

-**Red**: Less than 30% – Consider charging before installation
- **Yellow**: Between 30% and 70% – Acceptable, but monitor closely
- **Green**: Greater than 70% – Ideal for installation
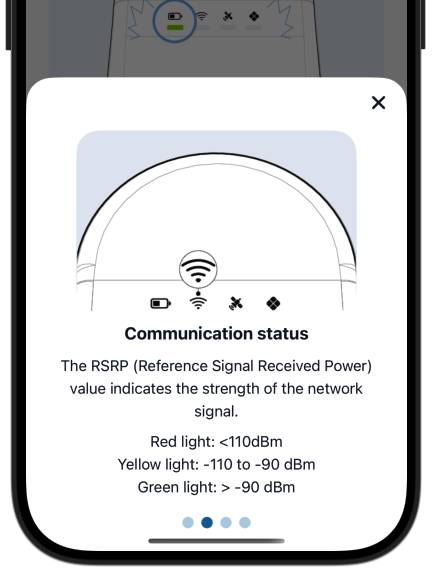
Communication Status
Shows the strength of the mobile network signal (RSRP):

-**Red**: Less than -110 dBm – Poor signal, may affect uploads
- **Yellow**: Between -110 dBm and -90 dBm – Acceptable
- **Green**: Better than -90 dBm – Strong signal
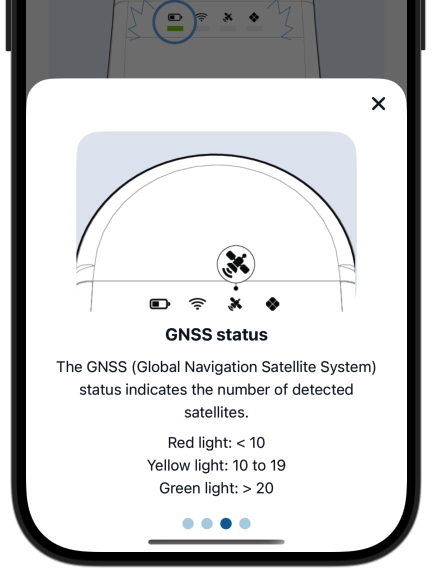
GNSS Status
Displays the number of satellites detected:

-**Red**: Fewer than 10 – Inadequate for accurate positioning
- **Yellow**: 10 to 19 – Moderate, acceptable for basic installs
- **Green**: 20 or more – Optimal satellite lock for precise data
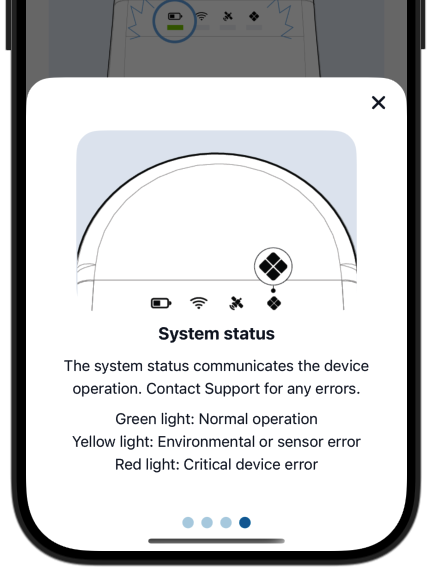
System Status
Communicates device health and operational errors:

-**Green**: Normal operation – Everything is working as expected
- **Yellow**: Environmental or sensor-related issue – Proceed with caution
- **Red**: Critical device error – Do not proceed; contact support
For the best performance, aim to install the device only when all lights are green. Yellow may be acceptable in some conditions, but red should always be addressed before continuing.
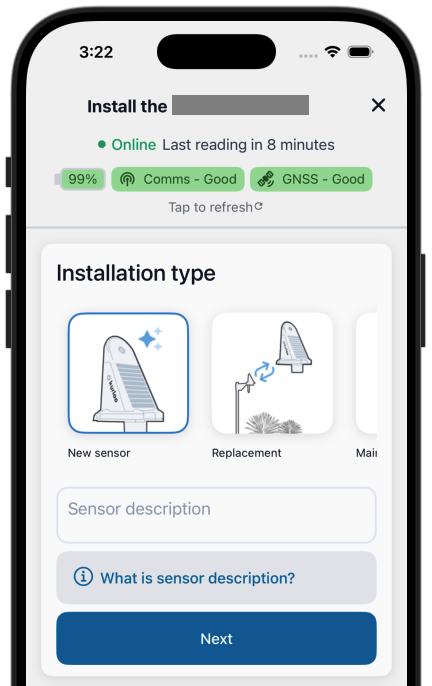
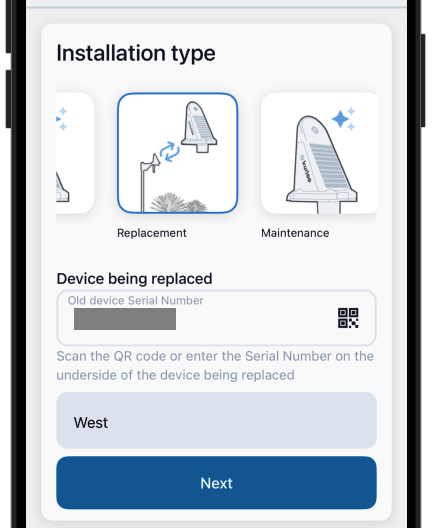
3.2.3 Confirm Install Type
When the installation screen loads, the installation type is typically preselected based on how you entered the workflow. In most cases, you won’t need to change it.
For new installation, you should choose:
- New Sensor – For setting up a brand-new Kurloo device at a new location
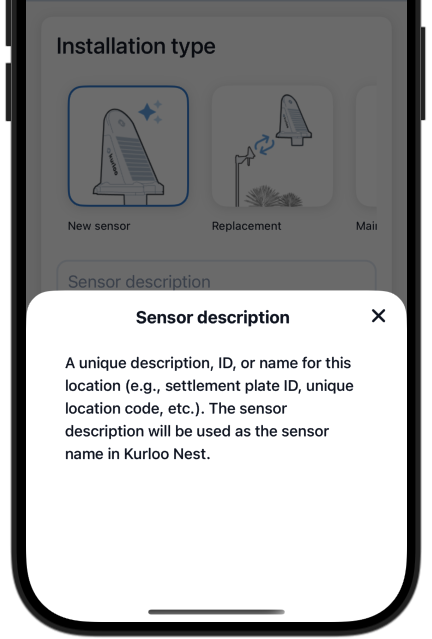
Provide a Sensor Description
If you're installing a New Sensor, you’ll need to enter a sensor description. This acts as the sensor’s name in Kurloo Nest and should clearly identify the monitoring location.
Examples might include:
- Settlement plate ID
- Borehole or stake reference
- Unique site or zone code
Tap “What is sensor description?” in the app if you need help choosing a name.
Once the description is entered, tap Next to continue with the installation.
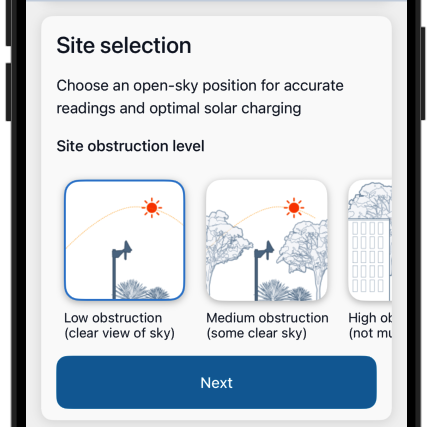
3.2.4 Site Selection, Mounting, and Aligning the Solar Panel & Antennas
Proper placement and alignment of your Kurloo device are essential for accurate readings and effective solar charging.
Site Selection
Choose a location with as much open sky as possible. The app will prompt you to select the site obstruction level:
- Low obstruction – Clear view of the sky (ideal for GNSS and solar)
- Medium obstruction – Some tree cover or nearby objects
- High obstruction – Buildings, canopies, or heavy cover (not recommended)
Aim for low obstruction whenever possible to maximise satellite visibility and solar efficiency.
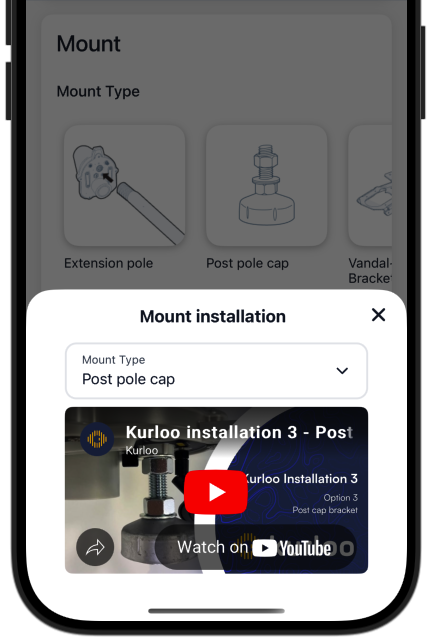
3.2.4.1 Mount Type
Select the mount type used for your installation. Options include:
- Extension pole
- Post pole cap
- Vandal-proof bracket
- Other – For custom or non-standard installations
Tap “View mount installation guides” in the app to watch step-by-step videos for each mount type. These guides are hosted on YouTube, so an internet connection may be required to view them.
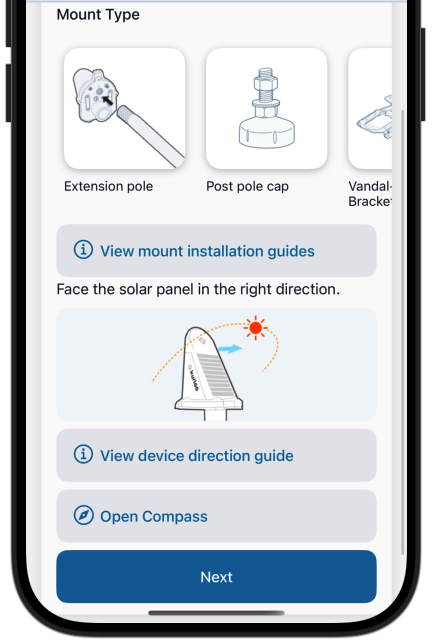
3.2.4.2 Aligning the Solar Panel & Antennas
Correct alignment of the solar panel is critical for ensuring optimal power supply throughout the day.
1. Determine Your Hemisphere:
- Southern Hemisphere (e.g., Australia): Face the solar panel north
- Northern Hemisphere: Face the panel south
- Near the equator: Face east or west, depending on your energy needs and site conditions
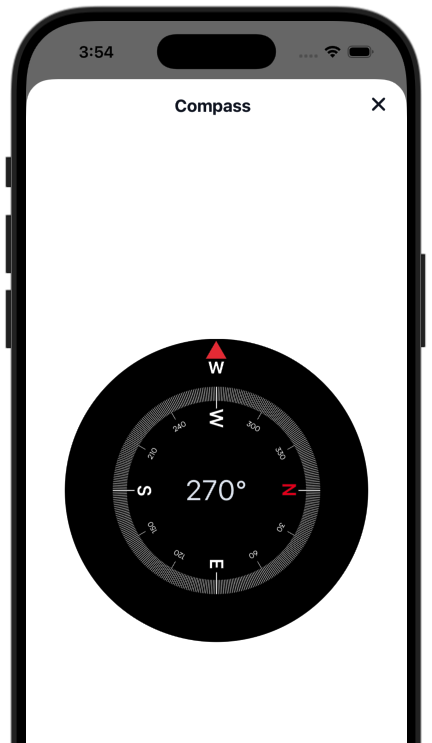
Use the in-app Compass tool or the Device Direction Guide to assist with correct orientation during the installation
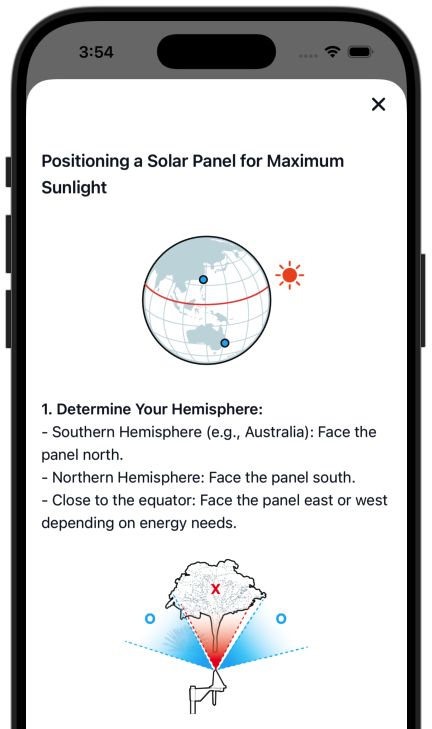
2. Avoid Obstacles:
- Install the device in an open area, away from trees, buildings, or structures that could block sunlight
- Pay special attention during peak sunlight hours (10 AM – 3 PM), when shading can have the biggest impact
3. Check Sun Path and Shadows:
- Use a solar pathfinder app or similar tool to assess shadowing and sun movement throughout the year
- Ensure the panel receives uninterrupted sun exposure for the majority of the day
Finally, point the LTE-M antenna toward the nearest mobile tower to maximise network signal. Proper positioning during installation avoids power and connectivity issues down the track.
Once your mount is secured and the panel is properly aligned, tap Next in the app to continue the installation process.
3.2.5 Record Height and Ground Surface Details
Accurately recording the height and ground type helps ensure reliable displacement calculations and comparison across installations.
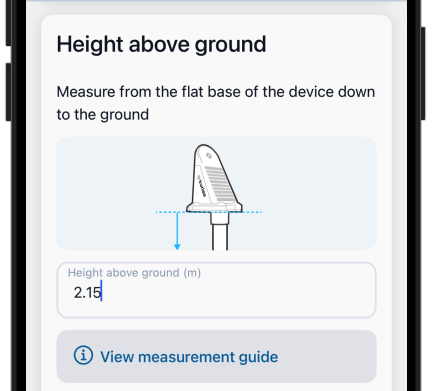
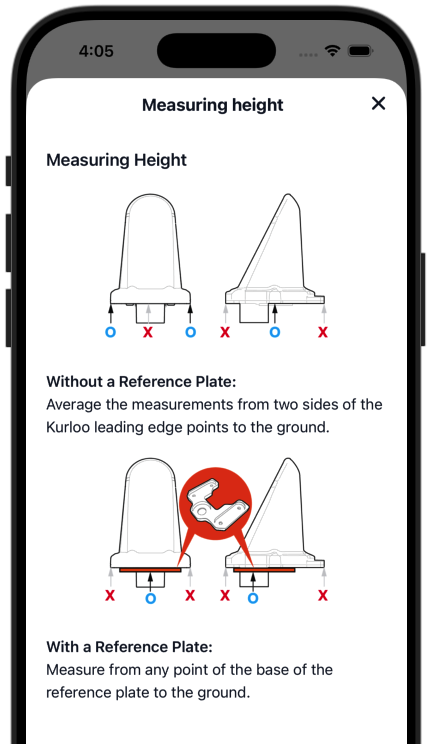
3.2.5.1 Measuring Height Above Ground
You’ll be asked to enter the vertical distance from the flat base of the device down to the ground surface. This can be done in two ways:
Without a Reference Plate:
- Measure from both sides of the device’s leading edge to the ground
- Enter the average of these two measurements into the app
With a Reference Plate:
- Measure directly from any point on the base of the reference plate to the ground
- This method provides a more consistent reference point
Tap "View measurement guide" in the app if you’re unsure where to measure.
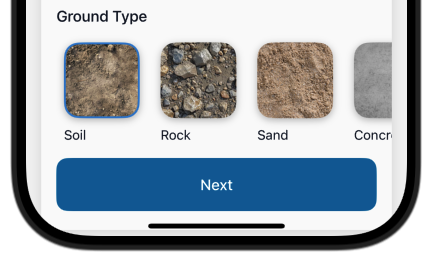
3.2.5.2 Selecting Ground Type
Choose the surface type where the Kurloo device is installed. Accurate classification helps contextualise movement data and environmental conditions.
Available options:
- Soil
- Grass
- Rock
- Sand
- Concrete
- Peat
- Other – Use this if the ground type doesn’t clearly fit any listed category
Select the option that best represents the surface directly beneath the installation point.
Once both fields are completed, tap Next to continue.
3.2.6 Recording Site Photos, Confirming Location, and Adding Notes
Clear documentation of the installation site helps with device verification, future troubleshooting, and overall data integrity. This final step captures critical visual and contextual information.
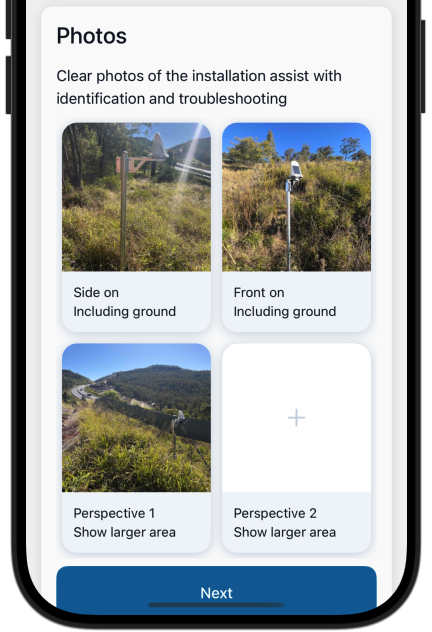
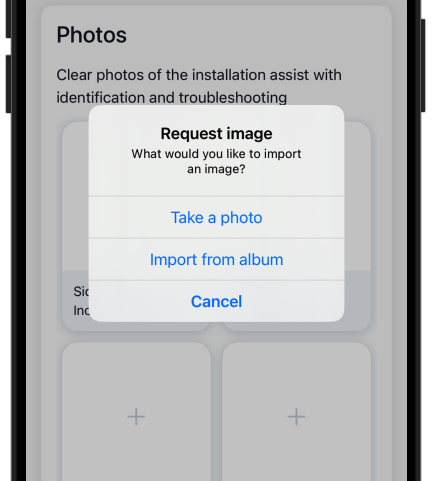
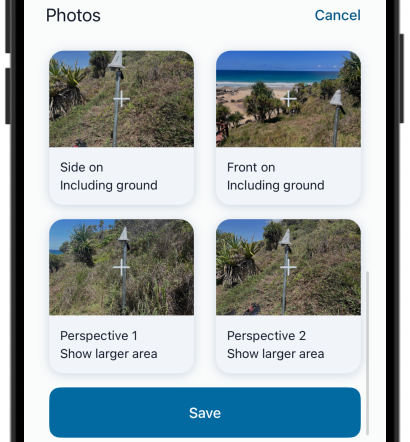
3.2.6.1 Site Photos
You’ll be prompted to capture or upload four key photos:
- Side on – Shows the sensor from the side, including the ground
- Front on – Straight view of the sensor and surrounding setup
- Perspective 1 & 2 – Wider area views to give site context
Photos assist with identifying installation conditions and ensure visibility of orientation, height, and surroundings.
Tap on a photo slot to either take a photo or import from album. After uploading, you can choose to replace, delete, or set it as the key image.
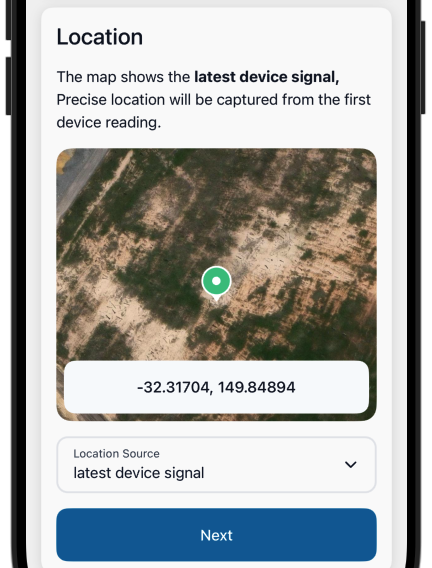
3.2.6.2 Confirming Device Location
The app displays a map allowing you to select the most appropriate source for the device’s location. Available options include:
- Latest Device Signal – GNSS coordinates from the Kurloo device itself
- Sensor Location – Used for replacements or maintenance; inherits the previously registered location
- Your Current Location – Captured using your phone’s GPS
- Project Location – The default location assigned to the project
The app follows this priority to ensure the best accuracy: Sensor Location (if applicable) > Latest Device Signal > Your Current Location > Project Location
Don’t worry if the location on the map doesn’t appear perfectly accurate during installation. The final position will be automatically corrected once the Kurloo device completes its first GNSS reading. No manual action needed. Let Kurloo do its magic.

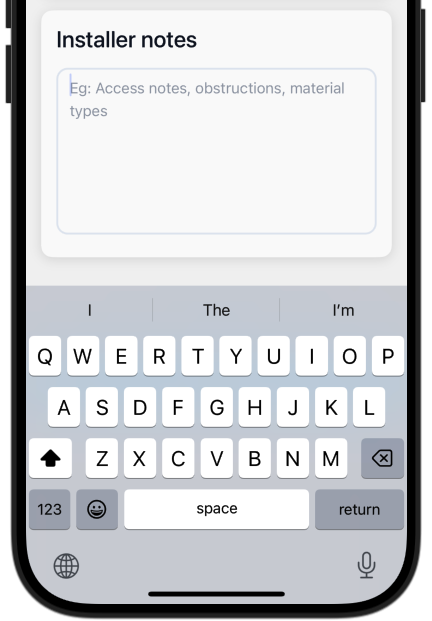
Installer Notes
Use the notes section to record any additional site observations such as:
- Access instructions or hazards
- Ground conditions or nearby obstructions
- Installation-specific details (e.g., mounting tweaks, weather conditions)
These notes are especially valuable for project managers, future maintenance, and remote support.
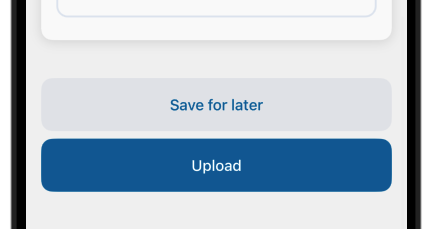
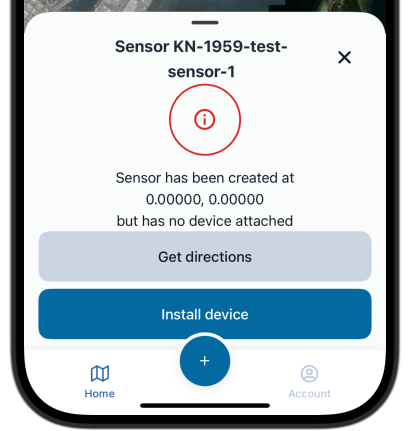
3.2.7 Complete the installation
Once all information is entered and confirmed, tap Upload to finalise the installation.
3.3 Performing Replacement
Replacing an existing Kurloo device is a straightforward process that ensures continuity of monitoring without data loss. The replacement process links the new device to the same location and metadata as the original.
Before proceeding, make sure you’ve completed the necessary preparations outlined in Section 3.1 – Preparing Before Attending Site. This includes charging the device, checking hardware, and ensuring the Kurloo app is installed and signed in with your project preloaded. Doing this ahead of time ensures a smooth replacement process on site.
3.3.1 Step-by-Step:
Locate the sensor to be replacedYou can find the existing sensor in two ways:
- Use the map view or sensor list to visually identify the device
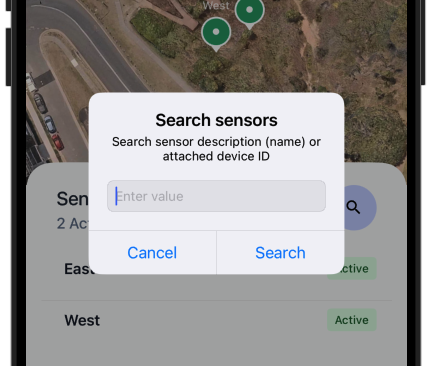
- Tap the search icon in the top-right corner of the sensor panel to search by:
- Sensor name (description)
- Device ID (attached Kurloo device ID or Serial)
Tip: If you're starting from the Quick Start menu (the "+" button), simply scan the old device’s QR code. If it’s linked to a previously installed unit, the app will automatically bring up the matching sensor record for replacement.
Confirm and verify the sensor recordEnsure the details shown match the sensor you're intending to replace. The app will display the current status, location, and name of the existing sensor.
Proceed with replacement steps On the sensor detail panel, tap the “Replace” button to begin the replacement workflow.
From there, follow the standard installation steps (refer to Section 4.3) to set up the new device.
For instllation type, you should choose Replacement – When you're replacing an existing device in the same position. Confirm that the detected device is correct in, then tap Next to proceed.
Be sure to update any changes in:
- Mounting type
- Mounting height
- Notes
This ensures the replacement device continues collecting reliable, consistent data.
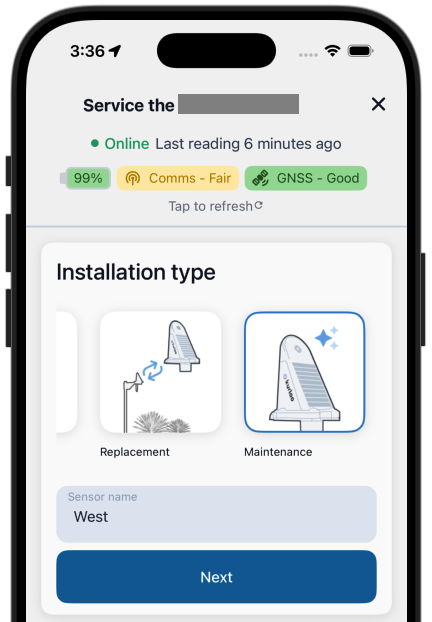
3.4 Performing Maintenance
The Maintenance function allows you to log service visits, inspections, or updates to a Kurloo device without replacing it. This helps maintain a clear record of the device’s lifecycle and condition, supporting traceability and troubleshooting.
3.4.1 Step-by-Step:
Locate the sensorUse the map view or sensor list, or tap the search icon to find the sensor by name or device ID. Refer to Section 3.3.1 - Step 1
Proceed with maintenance steps On the sensor detail panel, tap the “Service” button to begin the maintenance workflow. Refer to Section 3.3.1 - Step 2 and 3
From there, follow the standard update steps (refer to Section 3.2) to review and adjust the existing device setup.
For instllation type, you should choose Maintenance – Used for recording service, updates, or checks without a new device. Confirm that the detected device is correct in, then tap Next to proceed.
Be sure to update any changes in:
- Mounting type
- Mounting height
- Photos and location if conditions have changed
- Installer notes (e.g. what was checked or altered)
This ensures the sensor record stays accurate and up to date for ongoing monitoring and diagnostics. The system will attach the new record to the sensor's history for ongoing visibility.
Regular maintenance records help ensure long-term data quality and reduce the likelihood of undetected issues.
3.4.2 When to Use Maintenance
- Cleaning or clearing obstructions from the device
- Updating mounting hardware or repositioning
- Re-checking height or alignment
- Recording environmental changes (e.g., ground erosion or vegetation growth)
- Verifying device status during scheduled site checks
- Making changes to the recorded sensor data altogether (e.g. correcting metadata, updating notes, or amending previous entries)
3.6 Using Offline Mode / Guest Access
The Kurloo app can be used without logging in, which is especially helpful when you’re on-site with no reception, you don’t have login credentials, or your project fails to load.
Using the App Offline
You can create installation, maintenance, or replacement records while completely offline. Here’s how:
- Open the app and begin your record as normal. See Performing Installation
Your record is stored securely on your device
- Once you’re back online, log in (if you haven’t already)
- Assign the record to the correct project
- Tap sync to upload your records to Kurloo Nest
A reminder will appear if any drafts are waiting to be synced
Using the App as a Guest
If you don’t have a Kurloo login but still need to record data:
- Open the app and skip the login
- Follow the usual steps to create your record — see Performing Installation
- Use the Export Record option to send a copy to your project administrator – see Export Record
Note: Records created in guest mode won’t be uploaded to Kurloo Nest until imported by a logged-in user.
Whether you’re offline or just jumping in as a guest, you can keep working without interruption.
3.7 Transferring a Device to a New Monitoring Location
When relocating a Kurloo device, it should be treated as a new sensor installation. This ensures your project data stays clean, avoids inconsistencies between locations, and preserves accurate historical records.
Steps to Transfer a Device:
- Open the app and log in
- Select the project where the device is currently assigned
- Locate the device on the map or in the sensor list
- Tap to open the device’s detail view
- Scroll to the bottom and select “Detach Device”
Only project administrators have permission to detach a device
- After detaching, tap the Home tab and refresh the project view
- Follow Section 3.3 Performing Installation to install the device at its new location as a new sensor
By treating the transfer as a new installation, you ensure clear records and reliable data across all sites.
3.8 Export Records
If you’re working offline, using the app as a guest, or simply need to send a draft to someone else before uploading a record, you can export your saved record in just a few taps.
How to Export a Record:
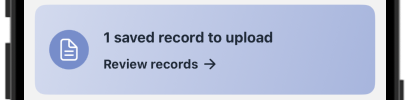
- From the Home screen, tap the banner that says “* saved record to upload” This opens the list of your saved drafts.
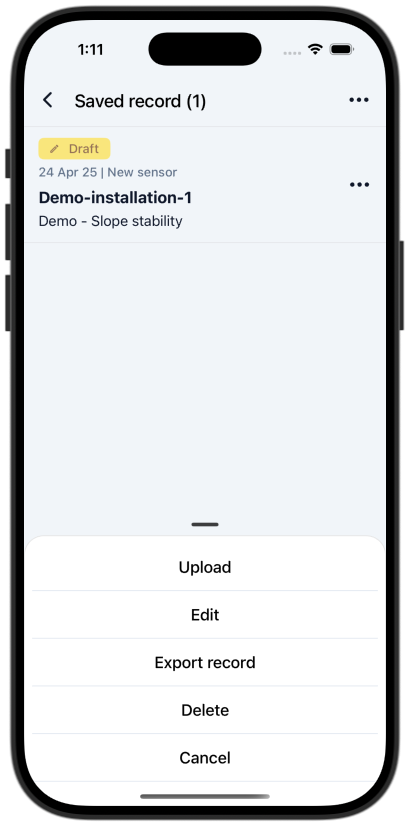
- Tap the draft you want to export to open the actions menu.
- Select “Export record” from the options.
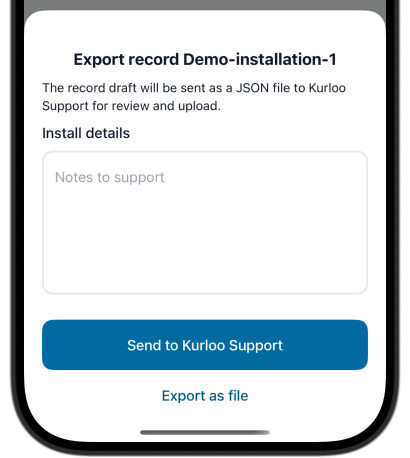
- Choose one of the following export methods:
- Send to Kurloo Support – Adds optional notes and emails the draft (as a JSON file) directly to Kurloo
- Export as file – Saves the record file to your device for you to manually send to your project admin or upload later
All exported files are in .json format and include all the data captured during the installation or maintenance process.
Exporting lets you keep your work moving—even when syncing isn’t possible.
4. Using the App
The Kurloo mobile app isn’t just for installs—it’s your go-to tool for everyday monitoring, record-keeping, and decision-making. Whether you’re on-site, in the office, or checking in between meetings, the app gives you instant access to the latest sensor data and device activity.
⸻
4.1 Changing Account and Projects
If you’re working across multiple projects or client accounts, you can easily switch between them without leaving the app.
How to switch:
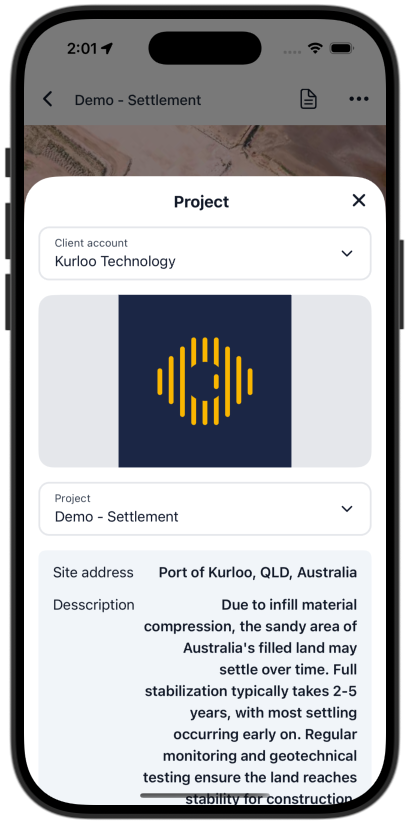
- From the Home screen, tap the three-dot menu (top right corner).
- The Account & Project panel will appear.
- Tap the dropdown under Client account or Project to change your current selection.
- Your view and sensor data will instantly update to reflect the selected project.
You’ll also see a brief project overview, including the site address and description, so you always know where you’re working and why.
Note: Project access and switching may be restricted based on your user role. If you can’t see other projects, check with your project admin.
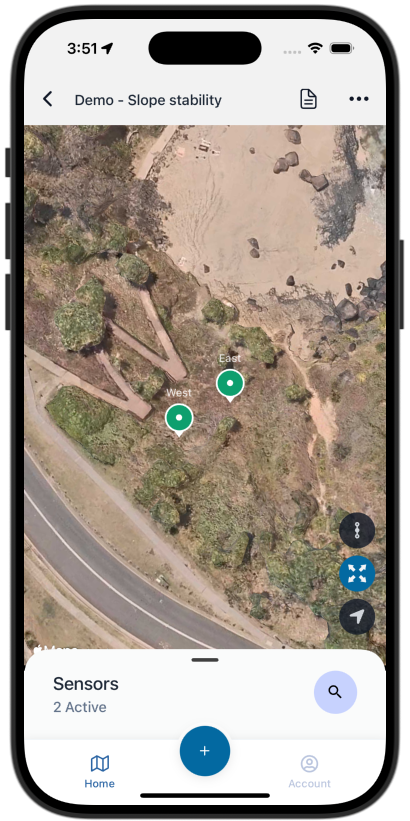
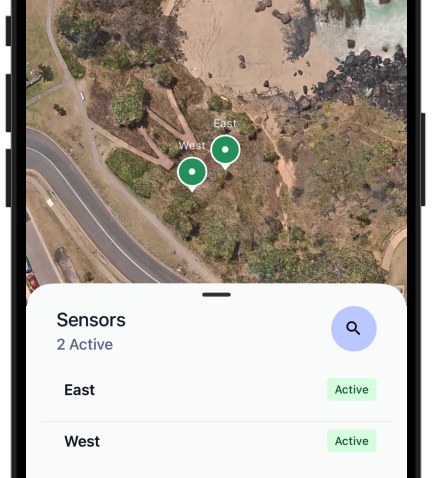
4.2 Viewing Devices on the Map
Use the map to quickly find and identify sensors within your project.
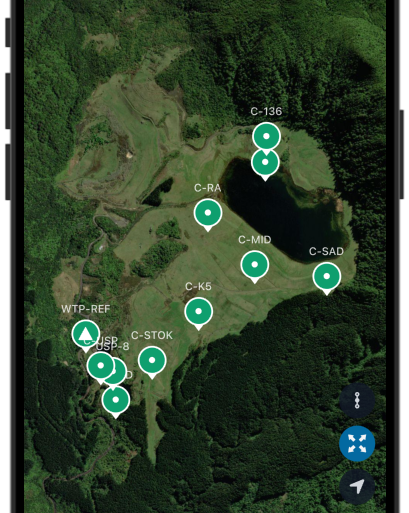
The interactive map is the easiest way to visualise your project at a glance. It shows the layout of all sensors in your selected project.
Zoom in/out or tap a sensor to view its details
Map Views Features (on the bottom right of the map):
All Devices in Project The default view shows every sensor in your project—even those not near your current location. Sensor name is displayed clearly with labels.
Use the expand icon to view all in full screen
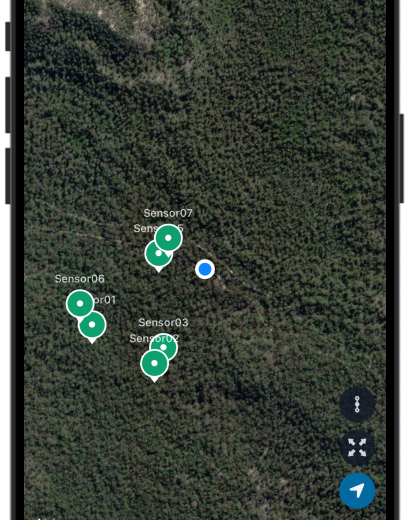
Nearby Devices When location services are enabled, you’ll see sensors located closest to your current position, helping you quickly find what’s around you on site.
Use the location icon to jump to your position
Network Map View In some projects, you’ll also see reference lines between sensors to help visualise spatial relationships and network layout. This is particularly useful for tracking coverage and data alignment.
Use the link icon to enable the reference network map
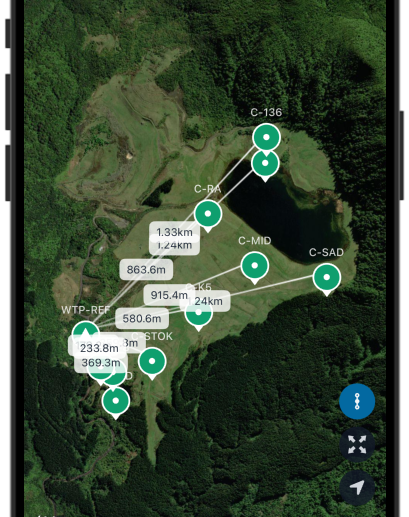
The map is designed to be your go-to visual reference—whether you’re in the office planning a site visit, or in the field locating a specific unit.
⸻
4.3 Monitoring Your Devices
Each Kurloo sensor provides real-time insights into its operational status, environmental readings, and signal strength. This helps you stay informed and quickly respond to any issues across your site.
⸻
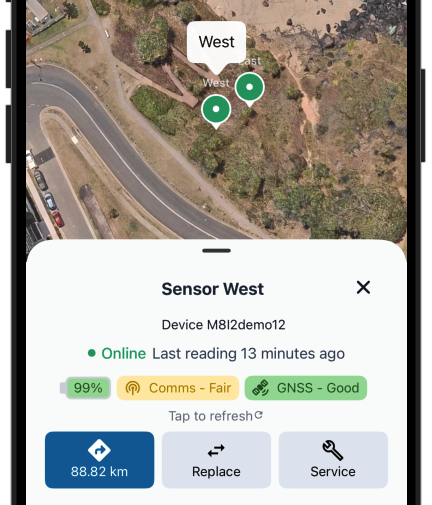
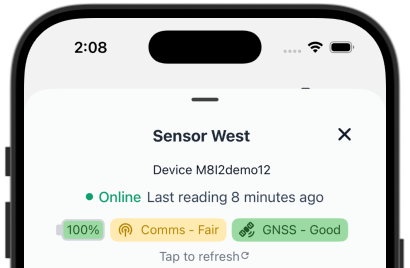
4.3.1 Device Status Dashboard
At the top of the sensor detail screen, you’ll find a quick summary of the device’s current status:
- Device ID and Base station Shows the distance from the device to its reference base station
- Online/offline indicator Shows if the device is actively communicating.
If no data is received for over 24 hours, the device is marked as offline.
- Last reading time Indicates when the last reading was successfully recorded.
- Battery level Displays the most recent battery reading as a percentage.
- Communication (Comms) Shows the LTE-M signal strength quality (e.g. Poor, Fair, Good).
- GNSS Reflects the GPS satellite connectivity from the latest reading.
Tap “Refresh” to request the most current reading from the sensor.
For explanations, see Section 3.3.2.2 Understanding the LED Status Lights
⸻
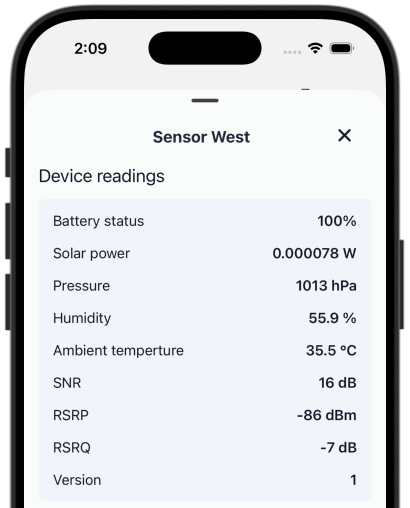
4.3.2 Device Readings
Scroll down to access the full list of sensor data collected:
- Battery status – Percentage of remaining power
- Solar power output – Live solar input in watts
- Environmental readings:
- Pressure (hPa)
- Humidity (%)
- Ambient temperature (°C) - Deprecated.
- Signal quality indicators:
- SNR (Signal-to-Noise Ratio)
- RSRP (Reference Signal Received Power – LTE-M)
- RSRQ (Reference Signal Received Quality – LTE-M)
- Wi-Fi RSSI (for Wi-Fi enabled devices)
- Firmware version – Current software version running on the device
⸻
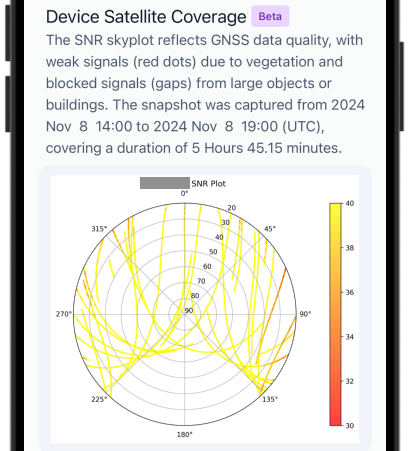
4.3.3 Device Satellite Coverage
This visual report (beta) shows the GNSS signal coverage over time using an SNR skyplot:
- Gaps or red zones indicate weak satellite signals—often due to trees, buildings, or terrain
- Strong, consistent lines indicate good visibility and signal strength
- Each plot covers a specific time range, clearly labelled at the top of the graph
You can pinch to enlarge the image if needed.
This is especially helpful for diagnosing issues at locations with dense vegetation or obstructions.
⸻
These monitoring tools make the Kurloo app a powerful daily companion—keeping you informed, responsive, and in control of your site conditions.
4.4 Displacement Monitoring
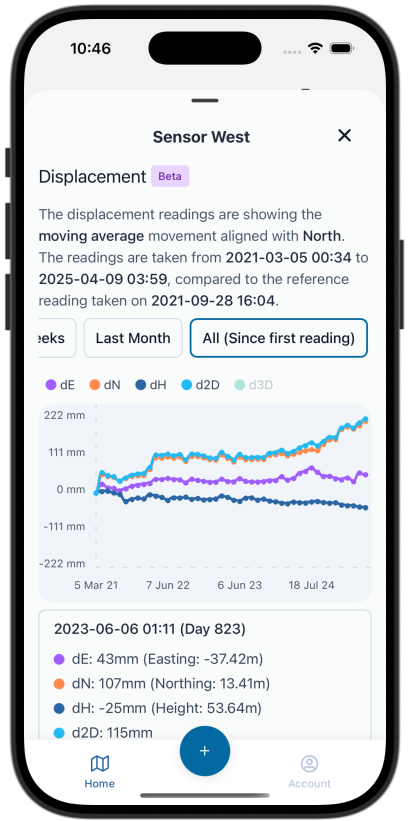
The Kurloo app allows you to easily track relative displacement trends directly from your mobile device. This view is designed to mirror the Sensor Relative Displacement section in Kurloo Nest, ensuring a seamless and familiar experience across platforms.
Key Features:
- Moving Average Display Displacement data is presented as a moving average, helping to smooth short-term noise and highlight long-term trends for easier interpretation.
- Period Options Quickly filter the graph by time range:
- Last 7 days – Readings compared to the project’s reference date
- Fortnightly – Readings compared to the project’s reference date
- 1 month – Readings compared to the project’s reference date
- All Readings – Includes all available readings, compared to the first recorded reading.
Note: To maintain app performance, when there are more than 45 readings, the app will display an evenly distributed sample across the full data set.
- Interactive Legend Tap any legend item to hide or show specific displacement components:
- dE (East), dN (North), dH (Height), d2D (horizontal displacement), d3D (total 3D movement)
- Data Point Inspection Tap on any point on the graph to reveal its exact displacement values in text, allowing for precise review without leaving the app.
⸻
Best Practice Tip: For critical sites, it’s recommended to check both 2D (horizontal movement) and 3D displacement (overall movement) weekly to detect any early warning signs of movement or instability. Regular review improves your ability to respond quickly and manage site risks effectively.
4.5 Understanding Sensor and Device
Tap a sensor on the map or list to view its complete record. Everything you need to know about that device installation details, site photos, and future maintenance history, is kept together in one easy-to-access place.

4.5.1 Sensor Photos
Photos play an important role in documenting the installation environment and ongoing site conditions. Each Kurloo sensor record allows you to view and manage associated images.
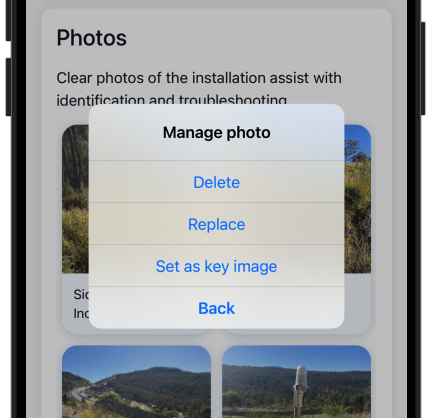
4.5.1.1 How to Manage Photos:
- Tap Edit under the Photos section to update images.
- You can upload or replace up to four key views:
- Side on – Including ground view to show the installation context
- Front on – Showing the device and immediate surrounding
- Perspective 1 – Capturing a wider area around the sensor
- Perspective 2 – Capturing a second wider angle for context
- After selecting or updating photos, always tap Save to finalise your changes.
Keeping your sensor photos up-to-date helps improve site management, supports maintenance records, and provides clear references for field teams and project stakeholders.
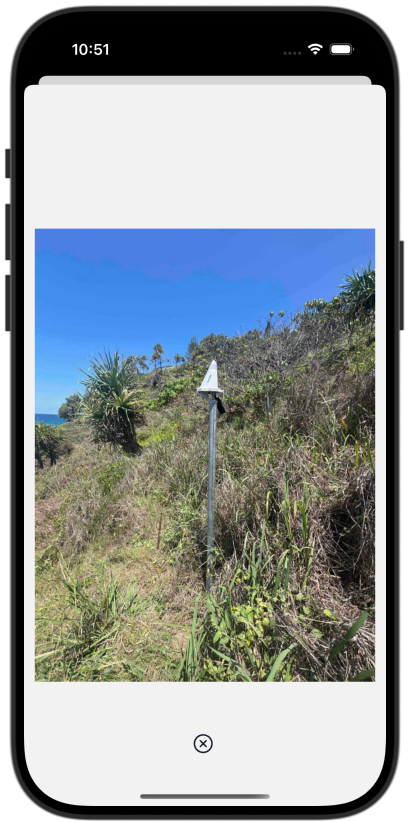
4.5.1.2 Viewing Photos:
- Tap any photo thumbnail to open the image in full-screen view.
- You can pinch to zoom and drag to inspect details more closely in the image viewer.
4.5.1.3 When to Update Photos:
- After significant site changes (e.g., erosion, construction nearby, vegetation growth)
- After major weather events impacting the site
- After the initial installation, if the installation was not recorded through the app
- After any maintenance or relocation, if the maintenance was not logged through the app
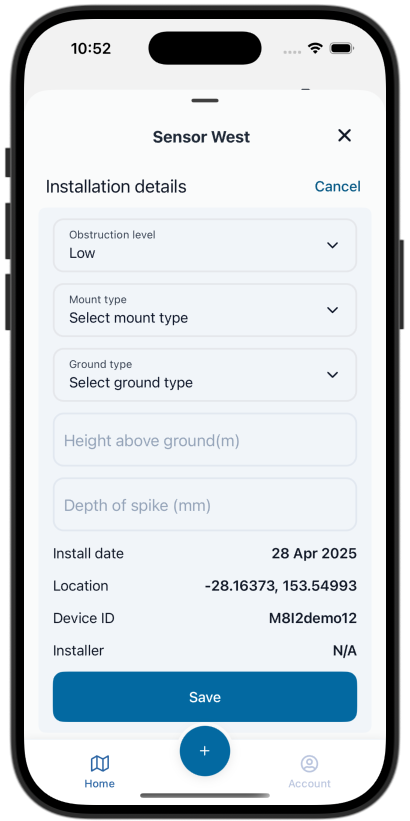
4.5.2 Installation Details
The Installation section records important information about how and where the sensor was set up. This ensures all project members and future site visits have clear reference data.
4.5.2.1 What You Can See:
- Install date and installer name (if available)
- Mount type and ground type
- Height above ground and spike depth
- Obstruction level (for GNSS performance context)
- Coordinates (latitude, longitude, and elevation)
- Sensor serial number and device ID
4.5.2.2 Updating Installation Details:
- Certain fields can be edited if site conditions change or corrections are needed (e.g., updated obstruction level after tree growth).
- After editing, always tap Save to update the record in Kurloo Nest.
Note: Some fields, such as installation date and device ID, are fixed and cannot be changed after initial installation.
Accurate installation records are critical for analysing sensor performance and understanding any environmental changes over time.
⸻
Best Practice Tip:
During every maintenance visit, take a few minutes to review and update the installation details if needed. Keeping site information current helps improve long-term data quality and troubleshooting accuracy.
⸻
4.6 Detach a device
⚠️ Caution: Detaching a device is a permanent action and cannot be undone from the app. Make sure you intend to remove the device before proceeding.
Detaching a device is used when you need to permanently remove it from its current location, such as when relocating or decommissioning a sensor. This action stops the device from sending further readings to its assigned project.
Important: Only project administrators have permission to detach a device.
⸻
4.6.1 How to Detach a Device:
- Open the sensor detail screen for the device you want to detach.
- Scroll down to the bottom and tap Detach Device.
- A warning message will appear explaining that the sensor will stop receiving readings.
- Confirm by tapping Proceed or Detach.
4.6.2 Once detached:
The device will be removed from the sensor, and the sensor’s status will change to Pending.
Historical data will remain available in Kurloo Nest for future reference.
Note: After detaching, you will no longer see the sensor in the mobile app. However, you can still access all historical data through Kurloo Nest if you have the necessary permissions. (WIP)
You can reinstall the device as a new sensor by following Section 3.3 Performing Installation.
⸻
Best Practice Tip: Only detach a device when you are certain it will no longer be recording at the current site or if you are planning to reinstall the same device at a new location. If you are simply updating site information or performing maintenance, there is no need to detach.
⸻
5. Alerts & Notifications (Experimental)
The Kurloo app includes an experimental alert system to help you stay informed about critical updates without needing to constantly monitor the dashboard.
⸻
5.1 What Alerts Are Sent
Currently, the following notifications are available:
- New Report Ready: When a new displacement or sensor status report is available, you will receive a notification. Tapping the notification will automatically open the app and load the corresponding project for you.
- Low Battery Warning (Experimental): You will be notified when a sensor’s battery drops below a critical threshold. This feature is still in testing and may be released in future app versions.
- More Alerts Coming Soon: Future updates will expand alert types, including signal loss warnings, sensor offline alerts, and maintenance reminders.
⸻
Best Practice Tip: Allow push notifications from the Kurloo app to stay informed of critical sensor updates, low battery warnings, and new report availability. Staying notified helps you catch issues early and act faster to keep your site safe and monitored.
⸻
6. App Settings & Customisation
The Kurloo app allows you to customise your experience with simple settings for your profile, language preferences, and app version management.
⸻
6.1 User Profile
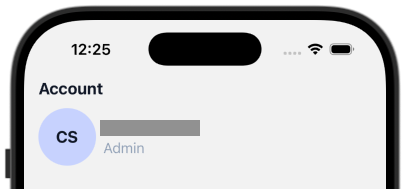
You can view and manage your basic user information in the Account screen. • View your name, email address, and assigned user role (e.g., Admin, Field Operator). • Change your password directly from the app if needed. • Log out of your account safely when switching users or devices.
Profile details are linked to your Kurloo Nest account and are used to control your project access and permissions.
⸻
6.2 Language (Experimental)
The Kurloo app will include early support for multiple languages. Language Settings: English is currently the default. Experimental support for additional languages is in testing and may be expanded in future releases.
⸻
6.3 App Updates & Version Info
Stay up-to-date with the latest features and bug fixes. • You can view your current app version at the bottom of the Account screen. • Enable automatic app updates through your device’s App Store or Google Play settings. • Regular updates include performance improvements, new features, and security patches.
⸻
Best Practice Tip: Always update the Kurloo app before heading to remote sites. This ensures you have the latest features, performance improvements, and bug fixes—keeping your work smooth and your data safe.
⸻
7. Troubleshooting & FAQs
If you encounter issues while using the Kurloo app, this section covers common problems and quick solutions to get you back on track.
7.1 User management
7.1.1 Why can’t I log in?
If you are having trouble logging in:
- Double-check that your email and password are correct.
Passwords are case-sensitive.
- If you’ve forgotten your password, tap “Forgot Password?” on the login screen and follow the instructions to reset it.
- Still can’t log in? Contact
support@kurloo.iofor assistance.
7.2 Device and Installation
7.2.1 Wi-Fi or LTE-M Connection Issues
If your device is not connecting properly to the network, follow these troubleshooting steps:
- Check device power Ensure the device is powered on. Short-press the power button (located on the side of the device); the LEDs should light up.
- Verify antenna connection Make sure the antenna is properly fastened and connected to the correct auxiliary port.
If using a high-gain antenna, double-check that all cables are securely installed.
- Check RSRP signal strength Confirm the device’s LTE-M signal quality:
- RSRP better than -90 dBm is strong
- RSRP between -90 dBm and -110 dBm is fair to weak
- Inspect for physical obstructions Ensure there are no major barriers (e.g., thick walls, buildings, dense trees) between the device and the nearest mobile tower.
- Confirm reception availability
- If using LTE-M, Your device and your phone both need reliable mobile reception to communicate properly.
- If using Starlink or similar services, ensure the satellite system has strong reception and working data connections.
- Understand LTE-M limitations
- LTE-M network coverage can vary by location.
- Always check local network conditions before proceeding with installation in remote or rural areas.
- Refresh mobile connectivityRestart the Kurloo app or toggle airplane mode on and off if you suspect the phone’s connection is stuck.
- Still having issues? Export the record (if applicable) and contact support@kurloo.io for further assistance.
⸻
Tip: Always test network reception at the installation site before setting up the device. This simple step can save time and prevent connection issues later.
⸻
7.2.2 Why isn’t my device appearing on the map?
If you can’t see your device on the map, try the following steps:
- Check your mobile reception: Ensure your phone has stable internet connectivity (4G/5G or Wi-Fi).
- Confirm you have the correct project selected Devices are only visible within the active project you have selected.
- Use All Devices in Project view Tap the button on the map to refresh the full project map and display all sensors.
- Allow time after uploading a new record If you have just completed and uploaded a new installation record, it may take a few seconds for the system to initialise the device. Tap the Home button on the tab bar and pull down to manually refresh all projects.
- Refresh or restart the app If the device still doesn’t appear, close and restart the app to force a full data refresh.
- Still having trouble? If the device still doesn’t appear after refreshing and restarting, please contact our support team for assistance:
support@kurloo.io
7.2.3 My Record Didn’t Upload. What Should I Do?
If your record hasn’t uploaded successfully, follow these steps:
- Check your connection You might be offline. The app automatically saves records locally when there’s no network available.
- Reconnect and sync Once you have internet access, open the app and try tp upload pending records again.
- Export and send manually If syncing still fails after reconnecting, use the Export Record function to save the record as a file and send it to your project administrator manually.
7.3 General
7.3.1 The App Crashes, Freezes, or Slows Down
If the Kurloo app crashes, freezes, or is running slower than expected, try the following steps:
- Check device compatibility Ensure your phone or tablet meets the minimum requirements listed in Section 2.2 Minimum Device Requirements.
- Restart the app or device Fully close the app and restart your device to free up memory and improve performance.
- Prepare before reinstalling If the issue persists:
- First, upload any pending records or use the Export Record function to save important drafts manually
- Then, uninstall the Kurloo app from your device.
- Reinstall the latest version from the App Store or Google Play to ensure you have a clean and updated installation.
⸻
Still having issues? Please contact support@kurloo.io with your app version, device model, and a description of the problem. We’ll help you sort it out quickly.
⸻
7.3.2 Can I use the app without internet?
- Yes, you can install devices and create installation, maintenance, or replacement records while offline.
- All records will be saved locally on your device until a network connection becomes available.
- Once you reconnect to the internet, simply open the app and upload and synchronise your data with Kurloo Nest. See Section 3.6 Using offline mode
Working offline ensures you can continue field operations even in areas with no reception, without losing any critical information.
⸻
8. Contacting Support
If you need assistance with the Kurloo app, our support team is ready to help. Here’s how to reach out and get the fastest possible assistance.
⸻
8.1 How to Reach Kurloo Support
You can contact Kurloo Support through the following channels:
- Email: support@kurloo.io
- Phone: +61 7 3366 3525
- Documentation and Guides: docs.kurloo.io
Our support team is available during standard Australian business hours, from 8:00 AM to 5:00 PM AEST, following Queensland (QLD), Australia public holidays.
⸻
8.2 What to Include When Reporting Issues
To help us resolve your issue as quickly as possible, please include:
- Your name and organisation
- Project name or ID (if applicable)
- Device serial number or sensor name (if applicable)
- A clear description of the issue
- Screenshots or exported records (if available)
- App version and device model you are using
Providing complete information allows us to diagnose and fix problems much faster.
⸻
8.3 Escalation Process
If your issue is urgent (for example, sensor offline affecting critical monitoring):
- Email support@kurloo.io with “Urgent” in the subject line.
- Call Kurloo Support on +61 7 3366 3525 after sending the email.
- Our team will prioritise the issue and escalate internally if necessary.
⸻
8.4 Feedback and Feature Requests
We welcome feedback! If you have suggestions for improving the app or want to request new features:
- Send your ideas to
support@kurloo.io
Your feedback helps us build a better Kurloo experience for everyone.
⸻
9. Terminology
This section explains some of the key terms used throughout the Kurloo app and documentation to ensure clarity and consistency for all users.
⸻
Kurloo Nest
The cloud platform where data from Kurloo devices is processed, visualised, and managed in a professional and easy-to-use fashion. Kurloo Nest provides access to displacement monitoring, device management, and project-level reporting and alerting.
⸻
Project
A group of monitoring sensors organised within the app and Kurloo Nest, typically aligned to a site, or campaign.
⸻
Sensor
Refers to the monitoring point where a physical Kurloo device is installed at a site. A sensor includes not only the device but also its assigned location, installation details, and movement history.
⸻
Device
Refers specifically to the physical Kurloo hardware that collects displacement and environmental data at a monitoring site.
⸻
Relative Displacement
The measured movement of a sensor relative to its reference position over time, typically shown as changes in East (dE), North (dN), and Height (dH) directions.
⸻
Moving Average
A technique that smooths out short-term fluctuations in displacement data by averaging a set number of readings, making long-term trends easier to identify.
⸻
RSRP (Reference Signal Received Power)
A key measure of mobile network signal strength used by LTE-M devices.
- Strong signal: Better than -90 dBm
- Weak signal: Between -90 dBm and -110 dBm
⸻
RSRQ (Reference Signal Received Quality)
A measure of signal quality relative to noise and interference, important for evaluating mobile communication reliability.
⸻
SNR (Signal-to-Noise Ratio)
Indicates the clarity of the satellite signal received by the GNSS system. Higher values suggest better signal quality.
⸻
Wi-Fi RSSI (Received Signal Strength Indicator)
Measures the strength of a Wi-Fi connection, used for Kurloo devices operating on Wi-Fi networks.
⸻
GNSS (Global Navigation Satellite System)
A collective term for satellite positioning systems, including GPS, GLONASS, Galileo, and BeiDou, used by Kurloo devices to determine their position.
⸻